
Ticket resale can be a confusing and time-consuming process, leaving many SeatGeek users wondering how to figure out the platform’s features, manage their listings, and ensure a smooth transfer to buyers.
Fret not, however. In this article, we will provide you with a clear and comprehensive step-by-step guide on how to resell your tickets on SeatGeek. Whether you’re using the mobile app on iOS or Android or the web platform, we’ll walk you through each stage, ensuring you can confidently list your tickets for resale.
How to resell tickets on SeatGeek
To conveniently resell tickets on SeatGeek, start by navigating to the Tickets tab, accessible through both the website and the mobile app. Once there, you’ll find the all-important “Sell Tickets” button using which you can resell your tickets.
![]()
Remember that to resell tickets on SeatGeek, they must first be listed in your account. This guarantees that everything goes down without a hitch. When your tickets sell, they will be sent to the buyer’s account instantly, without any intervention on your part. With this feature, you won’t have to worry about sending tickets to your customers.
Furthermore, SeatGeek keeps you in the loop throughout the process. You’ll receive timely email notifications as soon as your tickets are successfully sold. This means you’ll always stay informed and can proceed with your plans with ease, knowing your ticket resale is in good hands.
Here is a step-by-step walkthrough of the process:
Using the App (iOS and Android):
- Step 1: Launch the SeatGeek app
Begin by launching the SeatGeek app on your iOS or Android device. Ensure you’re logged into your SeatGeek account.
- Step 2: Access the “Tickets” section
Navigate to the “Tickets” section, located at the bottom of the app’s homepage. Tap on “Tickets” to proceed.
- Step 3: Choose the ticket group you want to sell
- Step 4: Initiate the Resale
After selecting the desired ticket group, look for the “Sell” option and select it. You’ll be prompted to specify the number of tickets you wish to sell and how they should be divided if there are multiple tickets within the group.
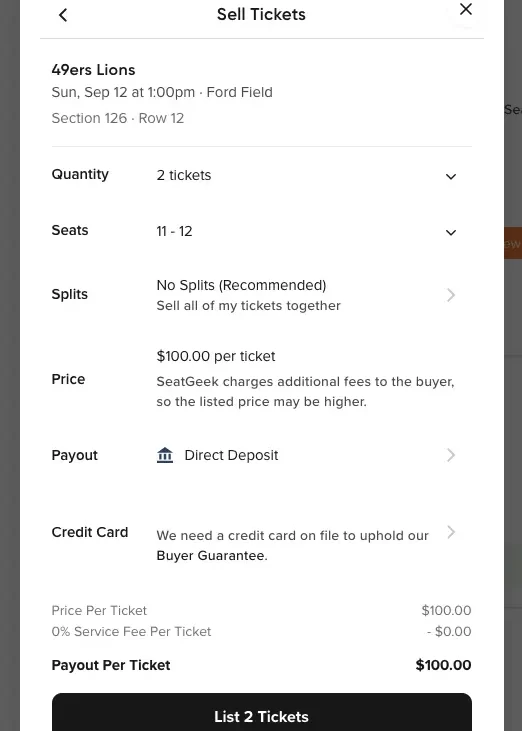
- Step 5: Determine the price at which you want to sell the tickets
Specify your selling price for the tickets. It’s important to note that some events may have a minimum price requirement when listing tickets for sale.
- Step 6: List your tickets
After entering the necessary details, choose “List Tickets” to complete the listing process. Your tickets are now up for resale.
You can rest assured that if your tickets are successfully sold, they will automatically transfer to the buyer’s SeatGeek account. Additionally, you have the flexibility to manage your listings at any time before the event begins. Simply tap “Edit” or “Delist” as needed.
Using the Web:
- Step 1: Sign into your SeatGeek Account with your credentials
Access the SeatGeek website through your preferred web browser and ensure that you’re logged into your SeatGeek account.
- Step 2: Navigate to “Tickets”
In the upper right-hand corner of the website, you’ll typically find an icon. Hover your cursor over this icon and then click on “Tickets.”
- Step 3: Choose the specific group of tickets you intend to sell by clicking on it.
- Step 4: Start the Resale
Look for the “Sell” option on the ticket group’s page and click it. Similar to the app, you’ll need to specify the number of tickets you want to sell and how they should be split if there are multiple tickets in the group.
- Step 5: Decide on a ticket price
Decide how much you want to charge for each ticket. Similar to the app, there may be a required minimum selling price for tickets to certain events.
- Step 6: Upload the tickets
Click “List Tickets” to initiate the listing process. Your tickets are now available for resale on SeatGeek. You have full access to your listings and may make changes or delete them at any point the event begins by using the appropriate buttons, “Edit” or “Delist.”
FAQs
1. Can I set any price I want when reselling tickets on SeatGeek?
Although you choose the prices for your tickets, there may be minimum and maximum limits imposed by certain events. If your pricing is higher or lower than these ranges, SeatGeek will let you know.
2. How do I receive payment for my sold tickets?
For ticket sales, SeatGeek relies on the Direct Deposit (ACH) payment method. The payout is processed and sent no later than 48 hours after the event. Adding a payout method to your SeatGeek account is all that’s required to start receiving payments.
Those living in the United States (apart from US territories) with a United States bank account and those living in Canada with a Canadian bank account are presently supported for payments on SeatGeek.
Final Words
Selling tickets on SeatGeek can sometimes feel confusing, but don’t worry! By following the step-by-step instructions in this guide, you can seamlessly list your tickets, set prices, and sell them confidently, whether you’re using the app or website.

Having earned a Bachelor’s degree in Commerce from Ravenshaw University, with a background in Accounting and Finance, Akshita Pattanayak contributes to UniTopTen by writing clear and concise articles based on Finance-Tech. With more than a hundred fin-tech related articles, she hopes to educate people about how banking and payment apps function.


